Deadlift Form: Step-by-Step Guide for Perfect Pulls

Muscular athlete sets up hip-hinge deadlift form, lats tight and core braced before the pull
Dial in your deadlift form—tighten your lats, brace your core, and load tension before the bar leaves the floor.

Deadlift form separates serious strength athletes from casual gym-goers. Deadlift form isn’t just another exercise—it’s a fundamental test of power, stability, and discipline. To perfect your deadlift technique, you must dial in meticulously, syncing your lats, core, hips, and grip into a unified powerhouse. Skip your setup details or neglect spinal alignment, and you risk losing both strength and safety. Mastering proper deadlift form ensures you dominate every rep.

This comprehensive guide provides biomechanics, professional coaching insights, and scientifically proven corrections to enhance your lifts. Whether starting out or refining advanced pulls, this resource helps you achieve consistently clean and powerful deadlift technique.

3 Easy Fixes to Perfect Your Deadlift Form


Perfecting your deadlift form doesn’t have to be complicated. Even experienced lifters make basic mistakes that compromise their lifts. Below are three straightforward fixes that immediately improve your deadlift technique and overall lifting efficiency.

Fix #1: Learn to Brace Properly for Deadlifts


Proper bracing is essential and foundational to your deadlift success. Bracing effectively locks your core and glutes simultaneously, crucial for maintaining deadlift form. Visualize someone throwing a heavy medicine ball at your stomach—instinctively, you’d tighten your abs and squeeze your glutes to brace for impact.

This instinctive reaction is precisely the bracing technique you must consciously employ before initiating your lift. Engage your abdominal muscles by drawing your belly button in towards your spine, activating your transverse abdominis (TVA), which provides deep core stability.

Simultaneously, squeeze your glutes firmly to maintain pelvic alignment and reduce stress on your lower back. Mastering this brace ensures a secure, neutral spine throughout the lift, significantly reducing injury risk and maximizing your lifting potential.

  • Effective Cues: “Brace as if catching a medicine ball,” “Squeeze glutes, tighten abs,” “Create diamonds.”
 

Fix #2: Deadlift vs. Squat – When hips are too Low


Understanding the clear distinction between a deadlift and a squat significantly impacts your lifting efficiency and safety. Dropping your hips too low mistakenly turns your deadlift into a squat, severely diminishing your power output and placing unnecessary stress on your spine. The proper deadlift technique sets your hips slightly higher—ideally above your knees but distinctly below your shoulders.

Your hips should act as a pivot, allowing you to hinge powerfully rather than squat down. Ensure that as you lift, your hips and shoulders rise simultaneously, maintaining proper alignment. Misaligning these levels creates unwanted shear forces that can lead to injury and compromised lifting performance.

Recognizing this crucial difference sets you up for a more efficient and safer deadlift.

  • Effective Cues: “Hips above knees, below shoulders,” “Push the floor away, don’t squat the bar up.”
 

Fix #3: Activate Your Lats for Stronger Deadlifts


Lats are often overlooked yet critical for powerful and safe deadlifting. Proper lat engagement stabilizes your spine, maintains optimal bar path, and transfers maximal force from your lower to upper body. Imagine bending the bar around your ankles as you grip it, or crushing oranges under your armpits—these cues effectively activate your lats.

Engaged lats reinforce the thoracolumbar fascia (TLF), a key connective tissue stabilizing your lower back and connecting your upper and lower body power. Keeping the bar extremely close to your body throughout the lift dramatically reduces leverage disadvantages, minimizing unnecessary spinal strain.

This enhanced lat engagement ensures your spine remains neutral, your pulls become stronger, and your overall lifting mechanics significantly improve.

  • Effective Cues: “Bend bar around ankles,” “Crush oranges under armpits,” “Pinch your lats.”

Training Splits & Deadlift Form Integration

Incorporating deadlifts strategically ensures continuous progress without burnout. Here’s how to integrate them effectively into your training splits.

Push/Pull/Legs (PPL) Split for Deadlifts

  • Pull Day: Conventional or sumo deadlift, 4-5 sets of 3-5 reps at 80-90% 1RM.

  • Leg Day: Romanian or deficit deadlifts, 3-4 sets of 8-12 reps at 65-75% 1RM.

Upper/Lower Split

  • Lower Body Strength Days: Conventional or trap bar deadlift, 4-5 sets of 4-6 reps at 80-85% 1RM, followed by accessory hinge movements such as Romanian deadlifts or glute-ham raises for 3 sets of 8-12 reps.

Hybrid or Full-Body Splits

  • Rotate between conventional deadlifts (heavy, 3-4 sets x 4-6 reps at 85% 1RM), Romanian deadlifts (moderate, 3-4 sets x 8-10 reps at 70% 1RM), and deficit or trap bar variations (lighter, 3-4 sets x 10-12 reps at 60-70% 1RM) throughout your weekly cycle.

Sample Deadlift Strength Training Block (Hybrid Split Focus)

This is a Hybrid Training Split built specifically to develop your deadlift across multiple domains: max strength, posterior chain hypertrophy, and grip and core endurance. Unlike a pure powerlifting or bodybuilding split, this hybrid layout blends conventional deadlifts, hinge-based accessories, and farmer-style movements to build total-body strength, stability, and resilience.

Use this block inside a 4–5 day training plan. It assumes you’re training deadlift-specific movements three times per week, alternating intensities and goals. The volume and exercise selection reinforce hinge patterns without creating excessive fatigue, while supporting growth and grip strength essential for bigger pulls.

DayExerciseSetsRepsIntensity (% 1RM or RPE)Rest IntervalFocus
Day 1Conventional Deadlift4580–85% (RPE 8)2–3 minMax Strength
 Good Mornings38–1065–70%60–90 secPosterior Chain Stretch
 Barbell Rows48–1270–75%60–90 secUpper Back, Lat Engagement
Day 3Romanian Deadlift3870–75% (RPE 7)90 secHamstring/Glute Emphasis
 Hip Thrusts310–1265–70%60–90 secLockout Power, Glute Drive
 Single-Leg RDLs38–10 per leg60–65%60 secAnti-Rotation, Hip Control
Day 5Trap Bar Carries420 secondsHeavy (85% of 5RM hold)90 secGrip & Core Strength
 Farmer’s Walks330 secondsModerate (RPE 6–7)60 secStability, Conditioning
 Kettlebell Swings410–15Explosive (RPE 8)45–60 secHip Snap, Posterior Power

Progression Strategy:

  • Week 1–2: Focus on technique and bar speed. Use lower percentages (70–80%) and clean execution.

  • Week 3–4: Push volume and intensity. Increase loads across your main lift by 5–10 lbs weekly.

  • Week 5: Deload—reduce sets by 30–40%, intensity by 10%, focus on quality movement and recovery.

Coach’s Note: This deadlift block works best when paired with either a Push/Pull/Legs or Upper/Lower Split, placing this Hybrid Deadlift Block on your posterior chain or pull-focused days. Recovery matters—don’t stack this with another heavy lower-body day without planning rest or accessory changes. This is real work—pull hard, recover harder.

Deadlift Fix‑Finder

Select the issues you notice, then click Show My Fixes for instant, targeted corrections.

Common Deadlift Form Mistakes and Corrections

Even strong lifters make rookie mistakes in their deadlift form—and often, it’s not for lack of effort but lack of precision. From jerking the bar off the floor to locking out with a hyperextended spine, these errors bleed strength, increase injury risk, and halt progress. Correcting them doesn’t require a total overhaul. 

It takes keen awareness, better cues, and some coaching-backed guidance. Below are the most common deadlift mistakes and the exact fixes that will clean up your pulls instantly. These corrections are backed by biomechanics and refined in real gym trenches—giving you stronger, safer reps fast.

Rounded Upper Back

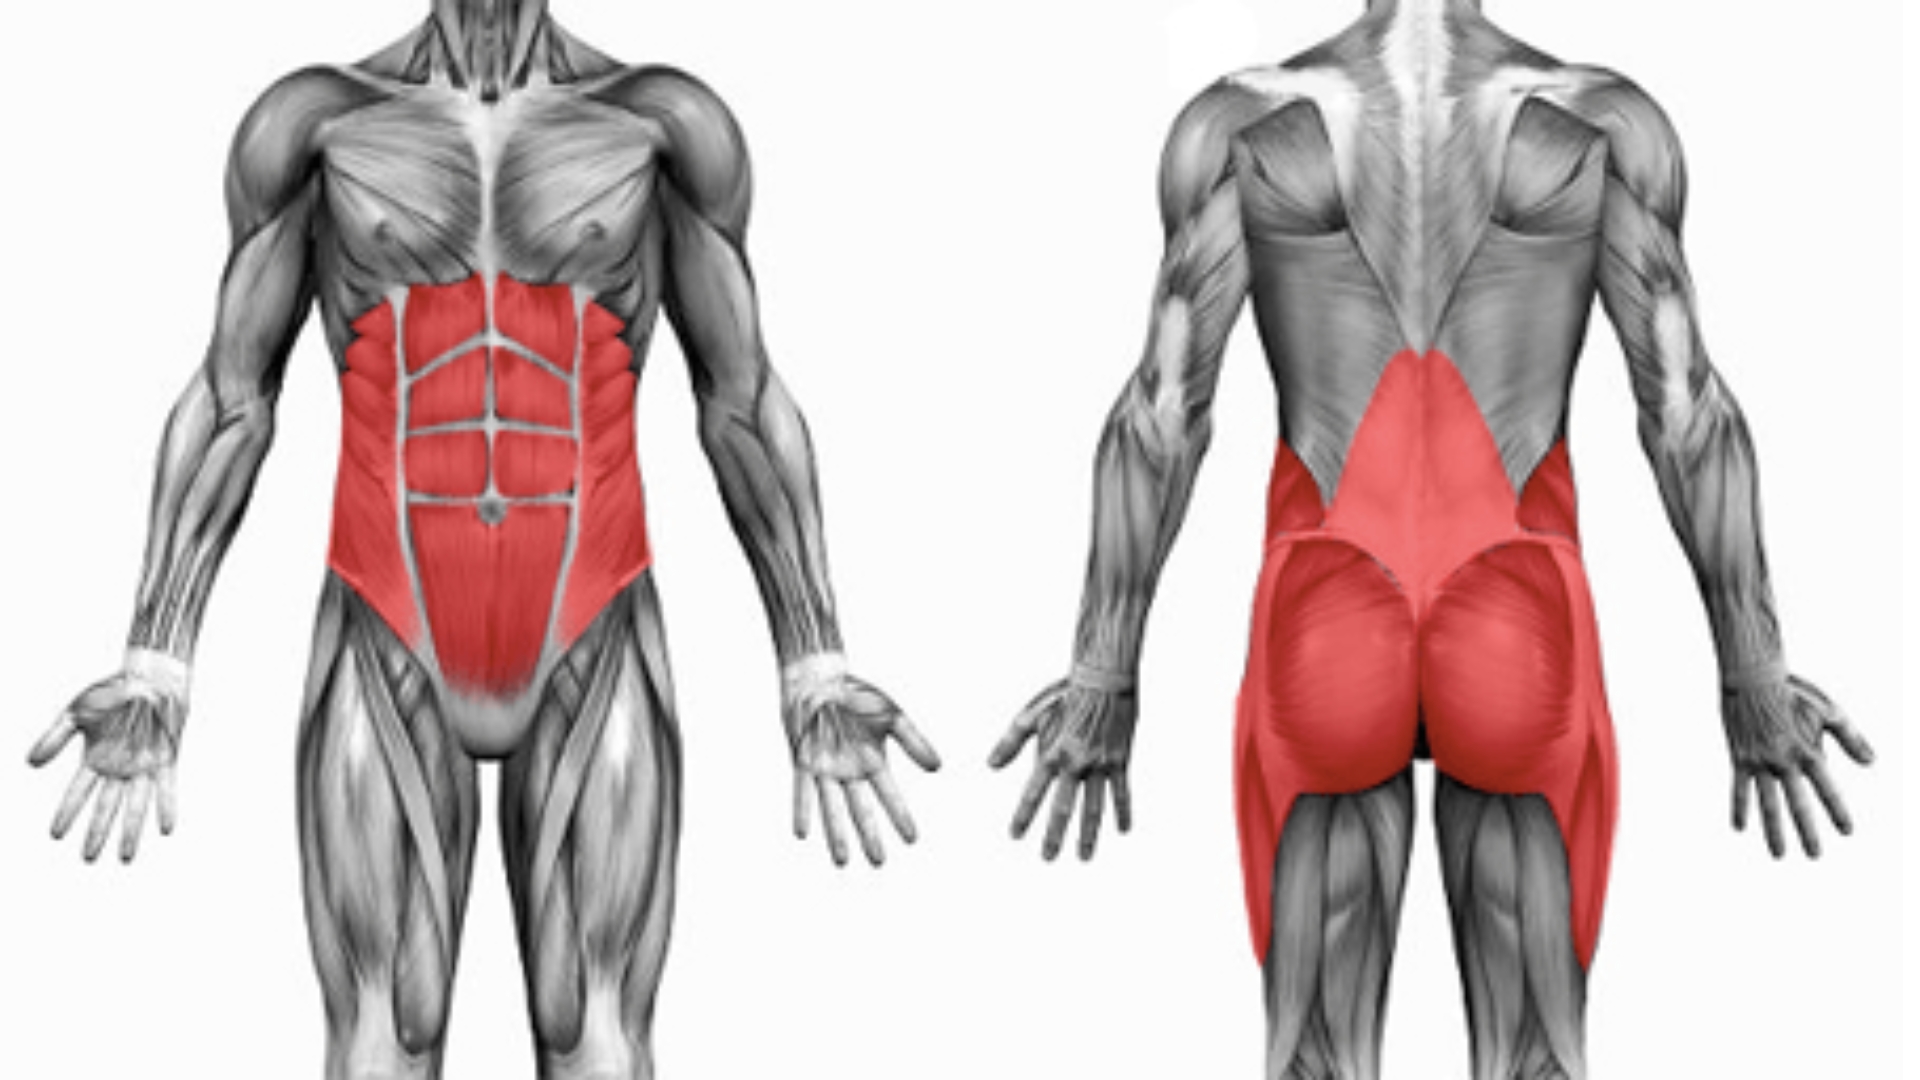
  • What It Does: A rounded thoracic spine shifts the load forward and places excessive stress on the vertebral discs, drastically increasing the risk of injury.

  • Fix: Engage your lats by “bending the bar” and lifting your chest while maintaining a neutral spine. Visualize pulling your chest through the bar.

  • Cue: “Chest tall, bend the bar, lats on.”

  • SEO Boost: Fix rounded back deadlift, deadlift spinal alignment

Jerking the Bar Off the Floor

  • What It Does: Jerking the bar leads to a sudden break in tension, which destabilizes your spine and reduces force production.

  • Fix: Set pre-tension by taking the slack out of the bar first. Feel the bar bend slightly, then initiate your pull with full-body tension.

  • Cue: “Pull the slack, then drive.”

  • SEO Boost: deadlift slack out of bar, smooth deadlift setup

Knees Too Far Forward

  • What It Does: Allowing the knees to shift excessively forward blocks the bar path and pushes the weight forward, compromising leverage.

  • Fix: Keep shins vertical and push hips back more during setup. Your knees should not track beyond the bar.

  • Cue: “Shins straight, hinge not squat.”

  • SEO Boost: deadlift bar path fix, knee position deadlift

Incorrect Hip Height

  • What It Does: Starting with hips too high or low shifts the emphasis away from the posterior chain and breaks the kinetic chain.

  • Fix: Set hips above knees but below shoulders. Your torso angle should create a diagonal line from shoulders to hips.

  • Cue: “Hips rise with shoulders, not before.”

  • SEO Boost: deadlift hip position, correct deadlift setup

Overarching at Lockout

  • What It Does: Hyperextending the lower back at the top adds spinal compression without increasing force output—it’s a common overcorrection.

  • Fix: Stand tall at lockout by finishing with glutes and abs, not your low back. Your body should form a straight line—not a backwards arch.

  • Cue: “Ribs down, glutes tight, finish tall.”

  • SEO Boost: deadlift lockout form, finish deadlift safely

Core, glutes, and trunk muscles highlighted—prime movers in strong deadlift form

Quick Guide to Deadlift Mistakes and Fixes

MistakeConsequenceFix & Cue
Rounded Upper BackLoad shifts forward, injury riskChest tall, lats on, bend the bar
Jerking Bar Off FloorTension loss, instabilityPre-tension, pull the slack, drive
Knees Too Far ForwardBar blocked, poor leverageVertical shins, push hips back
Incorrect Hip HeightLoss of power, poor bar pathHips above knees, rise with shoulders
Overarching at LockoutSpinal compression, wasted energyRibs down, glutes tight, upright finish
A clean hip hinge trains hamstrings and glutes while reinforcing the bar-close cue for bulletproof pulling mechanics.

In Closing...

Your deadlift form is more than just mechanics—it’s a statement of strength, control, and athleticism. Mastering the hinge pattern, dialing in bracing and lat tension, and syncing your bar path with hip drive aren’t optional—they’re foundational. The difference between pulling clean and pulling sloppy isn’t effort—it’s execution.

Whether you’re an athlete chasing PRs or someone who just wants to protect their back and lift with power, this guide gives you the tools. But tools mean nothing without consistency. Record your lifts, review your footage, and hold yourself to a higher standard. Perfect pulls come from perfect reps.

Every session is a chance to refine your hinge, reinforce your lats, and lockout clean. Own the details. That’s where real strength is built.

FAQ Section


Hip-width for most, toes slightly out. Your shins should touch the bar, with it cutting across your midfoot when viewed from above.


Yes—once you’ve learned to brace. A belt amplifies intra-abdominal pressure but won’t replace poor bracing mechanics.


Absolutely. Try alternating heavy and light days, or switching variations like conventional and Romanian.


Focus on simultaneous hip and shoulder rise. Cue: “Push the floor away.” Recheck your hip height before the pull.

If you’re plateauing, feeling chronically sore, or missing workouts because of life demands, it may be time to switch splits. Also, changing splits can realign your training goals, like focusing more on power, hypertrophy, or conditioning depending on your evolving needs.


Engage your lats like you’re “bending the bar.” Keep it close to your shins and thighs throughout.


No. Deadlifts break down fast with fatigue. Leave 1–2 reps in the tank and focus on form over burnout.


What’s the best warm-up before deadlifts?


Only for conventional/sumo. RDLs and rack pulls have different ranges and don’t require floor contact.

Mastering your deadlift form optimizes your strength potential and safety. Consistently apply these cues, track your lifts, and analyze your performance. Train smartly, lift powerfully, and dominate your workouts.

Resources

coachjohanncscs.com only uses primary research and scholarly studies as references over secondary sites. Other references are primarily from reputable social media accounts of experts only in the fields of health, nutrition, sports science, physiology, psychology, and physical therapy. 

Claim Your Free Gift– Sustainable Strength

Guide

What’s Inside the Sustainable Strength Guide:

  • Sustainable Strength Principles
    Train hard without burnout or injury.


  • Pillars of Sustainable Strength
    Simple strategies—Rev Up, Reform, Rehearse, Rhythm, Rest—that keep you training effectively, moving better, and recovering smarter.


  • Weekly Training Template
    A clear, flexible training schedule built around your real life.


Plus: Use The Macro Calculator!

  • Find precise calorie and macro based on our unique activity code.